Forms are an essential part of the NetSuite ecosystem, NetSuite provides a standard set of forms for every record type, however users can and should be reviewing the standard fields on the form, and optimising them to ensure that they are designed for fast data entry.
NetSuite provides a standard set of forms for every record type, however users can and should be reviewing the standard fields on the form, and optimising them to ensure that they are designed for fast data entry. The impact on speed of data entry for a well optimised form can be huge to a business. Consider how many times a day, week, month, year that users are entering data and it is pretty easy to see how even a 10 to 20 second improvement in form completion times can save significant time for users.
NetSuite administrators can customise the any standard form as per their business process requirements and needs and then set the newly created custom form as the preferred default form for the particular record.
Further more, different types of forms can be created depending on the nature of the record. An example of this might be having two variations of a form to cater for simple purchase orders, and more complex purchase orders.
In NetSuite, there are two types of forms:
- Entry forms
- Transaction forms
In this article we will help users understand how to set up the custom form for a faster data entry.
Optimising NetSuite Forms
There are four different elements in a custom form. These are:
- Standard and custom fields
- Standard and custom tabs
- Sub-lists and sub-list fields
- Standard and custom actions
We can customise each of these elements to make the form more user friendly and automated and save end users valuable time in form completion.
To Customise a form, any user with administrative access should be able to see this option at the top of any form.
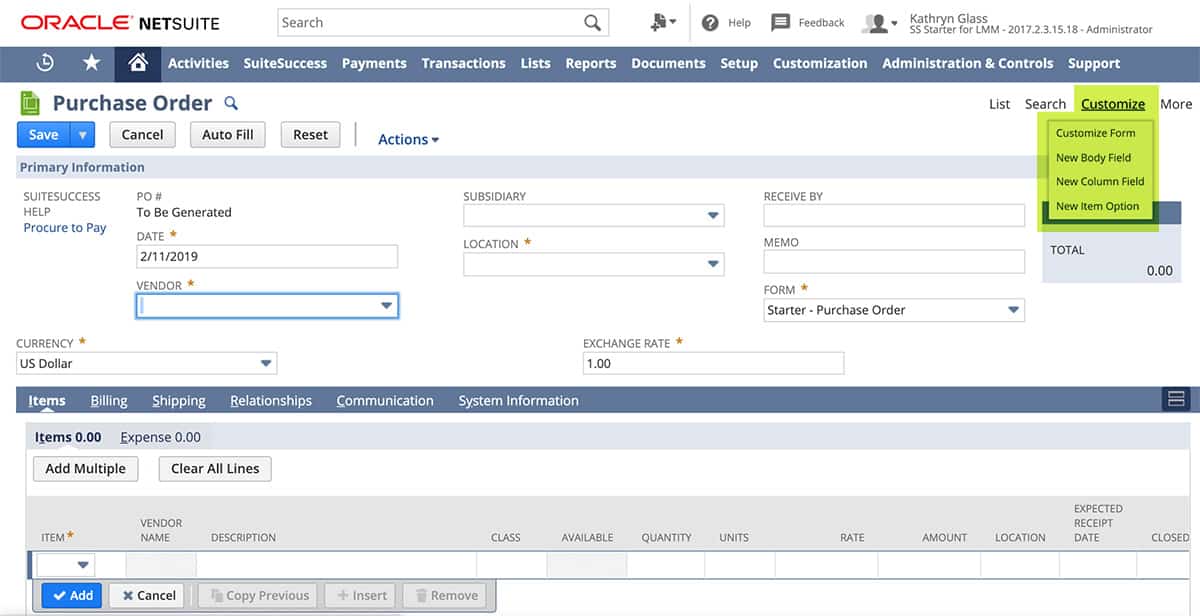
Another way to access the form customisation screen is from the tabs. Go to:
Customisation > Forms > choose the type of form you are trying to customise.
In the list of the forms, find the form you want to modify and Click on ‘Customise’ or ‘Edit’ button to open the form settings in the edit mode.
After you have entered the form customisation screen, you can begin to make the changes required to optimise the end user data entry experience.
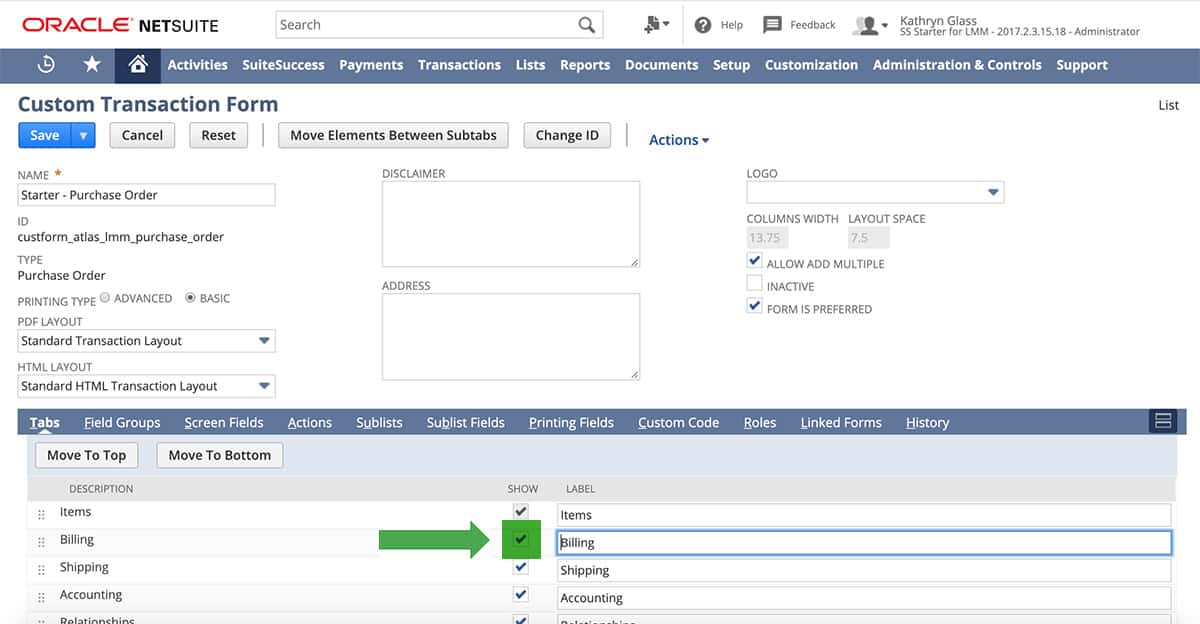
Showing or hiding tabs
The necessary tabs can be shown or hidden in the edit mode of the corresponding form. The user has to find the tab in the list that should be shown and check the checkbox in the ‘Show’ column to show the tab and vice versa.
By hiding the unnecessary tabs the user can remove the un-required information that can be distracting for users. Please note that some of the NetSuite standard tabs cannot be hidden and the checkbox is disabled by NetSuite.
Renaming the tabs, fields, sub-lists and sub-list fields
The user can rename the tabs, fields, sub-lists and sub-list fields to a name that is more inline with the terminology commonly used in your business. This will result in better understanding for the user and make it easier for new users to pick up the system.
We can find the option to rename the fields in the ‘Screen Fields’ or ‘Fields’ tab, sub-lists and sub-list fields in the ‘Sub-lists’ and ‘Sub-list Fields’ tab and in the label column.
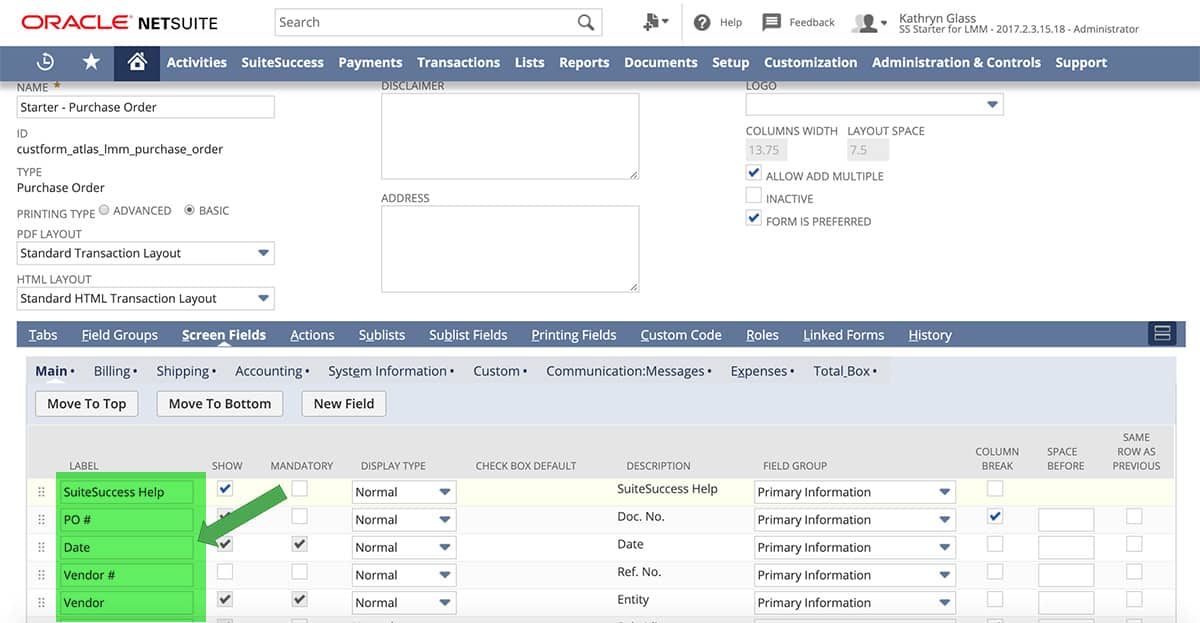
Showing or hiding fields
The necessary fields can be shown or hidden by checking or un-checking the checkbox in the ‘Show’ column to show the field and vice versa. Please note that some of the NetSuite standard tabs cannot be hidden and the checkbox is disabled by NetSuite.
We can find the option to show or hide the fields in the ‘Screen Fields’ or ‘Fields’ tab.
Modifying the field type as Mandatory
If there are necessary fields that should always be completed on the form, it’s a good idea to make the field mandatory to ensure data integrity and accurate reporting and searching. This will prompt users to enter values for the mandatory fields if they try to save the form without entering the required data. The field type can be changed to mandatory by checking the checkbox in the ‘Mandatory’ column.
Note: Think about the use case of making a field mandatory and use only when necessary, NetSuite will prevent users from saving a record if the field is mandatory, so make sure that this information is required 100% of the time, otherwise this can result in frustrated users or incorrect information.
Changing the display type of a field and making it inline editable.
NetSuite gives us the flexibility to change the display type of the field as per our requirement. These options can be found in the ‘Display Type’ column. We can disable or make a field inline editable with this functionality. By default a field’s display type is selected as Normal.
Renaming and changing the display type of actions
There are different types of actions that can be performed in the form. We can rename these actions to a more user-friendly name. In addition to this the frequently used actions can be shown as a button and the less frequently used actions can be shown in the menu. This helps to make the form look cleaner and improves end user experience.
Show or hide Sub-lists and sub-list fields.
Different sub-lists in the form can be shown and hidden as per business requirements. We recommended to hide a field if it is not relevant to the user or the form.
In addition to the above changes, we can also modify the custom fields in the field setup page. These changes apply to all forms using that field. We will be giving our advice for how to get the most out of NetSuite custom field creation in our upcoming tips and how-to’s.
Follow Klugo for NetSuite Hint’s and Tips. We post every Tuesday and Thursday. If you have any specific topics you would like us to cover, please feel free to reach out.
Need a specialist’s free advice?
Feel free to call an expert in NetSuite today.
Find out how cloud-based technology can support your business growth.